Monday, February 25, 2013
Sunday, February 24, 2013
This & That...
More post-it holders:
Stamps used: Buddy is from MC-5 (So Sweet), flowers and "hello" are from CL-9 (Hello).
Stamps Used: Heart is from MC-15 (Fuzzy Bear 1), "hugs" is from MC-16 (Fuzzy Bear 2) and mouse is from CL-2 (Happy Thoughts).
All stamps for this post-it holder and cupcake (below) are from MC- 4 (Happy Hello).
Have a great night!!
Saturday, February 23, 2013
Flower Pens
Just for fun I made a bunch of pens...I'm getting hooked on using those kokeshi faces...
I have a foam dot between the 2 flowers and between the top flower and the kokeshi face (for added dimension). I used Glossy Accents to coat each face, and for a secure hold between layers...and finally, to glue the flower to the pen.
I used Emi's face from stamp #6026:
Friday, February 22, 2013
It Just Dawned On Me...
that you can use the pilgrim hat from cling set MC-30 (Happy Thanksgiving) for a St. Patrick's Day treat:
Fuzzy dog is from cling set MC-32 (From Our Home).
MC-30 (Happy Thanksgiving)
Here's what it looks like opened. I didn't have any green candy handy...but, you get the picture ;) Click here to get to the how-to's. Happy Friday!!!
Tuesday, February 19, 2013
Cupcakes!!
One more idea using cling set CL-15 (Kokeshi)...cupcakes!!
 |
Click here for a pattern. Simply cut 2 pattern pieces out of contrasting papers. Glue the belt onto the main piece, matching the bottom edge. Then simply wrap around a cupcake and secure the end with double stick tape (you might want to put a couple of pieces of tape to hold it securely). Mount faces on a toothpick and add a ribbon...that's it!!
Monday, February 18, 2013
For Easter and Beyond...
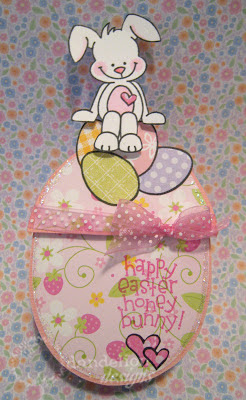
Did that sound a little Buzz Lightyear-ish? Anyway...I wanted to share with you the pattern that comes in cling set CL-5 (Happy Easter). It's an egg box:
Lift the cover...and a surprise pops out:
Ta-daaa!!
Here's the "beyond" part...simply replace the 2 egg pattern pieces with a cover piece (measuring 1-1/4" x 2-3/4") and a bottom piece (measuring 2" x 2-1/2")...and you've got a box that you could use for any occasion:
Stamps used: Bunny, chick and Egg stamps (as well as box pattern and instructions) are from CL-5 (Happy Easter)
#A120 (Honey Bunny)
Heart stamp is from CL-13 (Bear Hugs)
Henry the Hedgehog and tag stamp are from CL-9 (Hello)
Heart Border stamp is from CL-4 (Lots of Love)
"Happy Wishes" sentiment is from CL-1 (Happy Wishes)
Rose stamp is from MC-1 (Friend to Friend)
Thanks for stopping by today!!!
Saturday, February 16, 2013
More Chocolate Kokeshis
Hope you're all having a nice long weekend!! I was playing around with making more chocolate kokeshis (click here for original post)...and here they are:
Bride and Groom kokeshi...I used double stick tape to mount them on a 2-3/4" x 5" piece of card stock...then I stamped the words "Happily Ever After" and the rosebud (both stamps are from CL-14 (Roses) on a piece of vellum (the rose is stamped in black on front, and colored from behind)...then I just wrapped the vellum around the whole thing and taped it in the back. I was going to wrap it in a clear bag and throw some flowers and glitter in...but everything kept hiding behind the candy, so this is what I ended up doing:
It's hard to see with the glare...maybe this is a better angle:
I used a 5" x 6" bag with a seal. To start, I put the candies in the bag, on the left side (flap folds toward back to seal):
With the candy in this position, flip the bag over and upside down so the opening is now on the bottom. I used my Scor-Pal to make the cutting easier...just line the bag up in the upper right hand corner, then remove the candy:
I ran my scissors along the groove to keep my cutting straight. Make a cut along the 10" line...cutting through only one layer (the back side). Cut all the way to the fold, then cut 1" along the bottom edge (toward the corner of the Scor-Pal).
Lift the flap you've just created and run a piece of double stick tape at 1-1/4" from the right edge. Remove the backing from the tape and fold the flap back down to create the "pocket" for your glitter and flowers. Using regular scotch tape, tape over the cuts you made in the bag. Now slip you chocolates into the bag...and add flowers, glitter, ribbon on the other side and seal the top of the bag.
Here's an idea using a smaller sized chocolate for a baby. Follow the same directions from the original post except cut the card stock to1-1/2" x 3-3/4"...making your mark at 1/2" down from each side. The belt will be 1/2" x 3-1/4".
Click here to get a pattern for the little stand. Here's a view from the side:
Here's one for Girl's Day. The faces for these smaller chocolates are from CL-8 (Friends):
And one more:
ok...that's it!!!...hope you have some time to stamp this weekend!!!
Thursday, February 14, 2013
Trifold Flower Card for Girl's Day
Hi there...Tonight I tried using an old pattern with my new stamps from CL-15 (Kokeshi), but it was too small. Click here for a larger version. Simply cut along the solid lines and fold along the dotted lines. I put Emi on the front since she has bigger hair :)
Just change the sentiment and you've got a card for any occasion!! The card is an odd size (3-1/2" x 3-1/2")...so I decided to make my own vellum envelope:
Cut a 5" x 10" piece of vellum...score at 5" to form bottom fold...score 1/4" from each long side to form tabs. Cut away half the tab on each side (as shown below)...fold tabs and apply double stick tape and fold up along scored line.
Wednesday, February 13, 2013
A Last Minute Idea
How did Valentine's Day sneak up on us so quickly? In case you're a last minute crafter (I know you're out there)...here's a quick idea. Click here for the pattern.
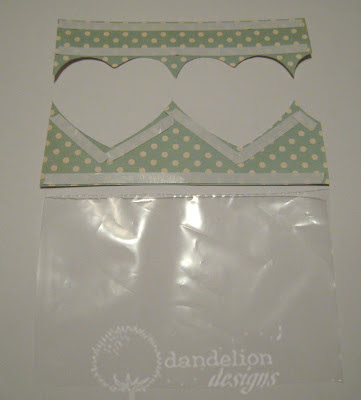
This first one uses stamp #C132 (Hugs) and the sentiment "Hugs" is from MC-16 (Fuzzy Bear 2). To start, cut out 2 pattern pieces along solid lines. Apply double stick tape to the backside of each piece, as shown below...also, cut out a 3-3/4" (h) x 5-5/8" (w) piece of cellophane (I didn't have any on hand, so I cut up a food storage bag and that worked out well too):
Remove the backing paper from the double stick tape on the curved edge of each piece (leaving the straight-edged tape in place, for now). Set the top and bottom piece in a desired spacing (you can make it a little shorter or taller depending on what's going inside). Adhere the cellophane piece as shown below:
Fold tabs along dotted lines and put a strip of double stick tape on the tab:
Fold in half and secure tab along side:
Remove tape backing along bottom edge, adhere and crimp...insert your goodies and then do the same to top edge...then decorate!! If you don't have time to do this idea for Valentine's, it can always carry over to other occasions:
SC-5 (Small Aiko)
Roses and "Happy Valentine's Day" sentiment from CL-14 (Roses)
Snake and "Year of the Snake" sentiment from MC-37 (Year of the Snake).
Subscribe to:
Comments (Atom)


