Showing posts with label Christmas. Show all posts

Friday, April 14, 2017

Winter!


Here's out winter stamp from our new set, Seasons (MC-63).  Decorate a key tag (found at any stationery store) and mount with a foam dot onto an anti-bacterial hand gel for an instant gift :)


Sunday, November 22, 2015

A Holiday Gift...


Made using stamps from MC-35 (Holiday Gift Card) which is on sale (50% off retail) until the end of the year!!  Click here for a sale order form.


Saturday, September 26, 2015

Snowmen Tags

Made a couple of tags with some extra snowmen...


Someone requested a pattern for a project I posted awhile ago for our "Teeny Weeny Scenery" (MC-55 - Teeny Weeny Garden) stamp:


For anyone else who may be interested...you can click here for a pattern.  While I was at it, I made another one using our Christmas sets (MC-53 - Teeny Weeny Christmas and MC-11 - Happy Holidays)


Hope you're all staying dry this weekend...perfect stay-at-home and craft weather!!!

Monday, November 24, 2014

Mini Box/Ornament


Mini Box/Ornament made using the pattern found here.  Poinsettia stamp is from MC-8 (Christmas Flowers) and Snowman stamp is from MC-53 (Teeny Weeny Christmas).

Sunday, October 12, 2014

Just the Snowmen...

Made a few treat boxes using just the snowmen from our new set MC-53 (Teeny Weeny Christmas).  To get a pattern, click here.


Sunday, October 5, 2014

Teeny Weeny Christmas

This set is the first in a new series called "Teeny Weeny Scenery".  A couple of months ago I was trying to create a winter scenery to fit the size of my medium cling set which measures about 2-1/2" x 3-1/2".  It doesn't seem very large, but it was very difficult to fill in that much scenery.  After awhile I scrapped the idea, but it kept coming back to me.  Maybe if I tried doing it on a smaller scale...


I tried to add in as many layers as I could to give this card dimension.  I used foam dots to pop up the snow, the trees and the snowman.  On the pink frame, I popped up the holly.  To make the window for the card, I sandwiched some glitter between 2 pieces of acetate (sealed with double stick tape) and taped behind the open window to look like snow:


Mount the frame onto the scenery with more pop dots.  To make the card base, I cut a 3-3/4" x 7-1/2" piece of card stock (scored at 1-1/2" and 3-3/4").  Glue the bottom half of the scenery to the bottom half of the card cover (up to the fold line).  On the inside of the card, stamp a greeting and pop up another image to hold the easel.


Here's another version of the card:


Keeping the window round makes it look more like a snow globe:


Monday, September 29, 2014

Sunday, November 3, 2013

Sweet Christmas Wishes

A sweet way to share some love during the holidays...


Sweet Christmas Wishes and Candy Cane stamp are from MC-10 (Sweet Wishes)
Penguin stamp is from MC-35 (Holiday Gift Card)


Bear stamp is from CL-13 (Bear Hugs),  Santa hat is from MC-33 (Merry Christmas)


Sachi stamp is from MC-25 (Hi There)


Snowman stamp is from MC-31 (Holiday Cookies)

Simply get 2 candy canes and tape the ends together with clear tape to form a heart shape.  Cut a strip of white card stock measuring 1-1/4" x 5-1/2".  Stamp "Sweet Christmas Wishes" (MC-10 - Sweet Wishes) on one end and wrap the other end tightly around the candy cane (leaving enough space for your stamped image).  I made a small mark at the edge of the candy cane (see below):


I used a 1/8" hole punch at that point (through the front of the tag as well as through the part that's wrapped around the candy cane).  With the tag wrapped around the candy cane, thread your ribbon through both holes and tie into a bow.  Mount your stamped imaged on double stick foam.

Tuesday, October 22, 2013

Friday, October 11, 2013

Mixin' and Matchin'

More mixin' and matchin' to make this little tag...


Large Holly (MC-8 Christmas Flowers), Haku headband (MC-21 Celebration), Mele Kalikimaka sentiment (MC-36 Hawaiian Christmas) and Hula Girl (CL-17 Aloha).

Thursday, October 10, 2013

Merry Christmas from Hawaii

Back to share a quick holiday card...perfect for family and friends who live away!


I used MC-33 (Merry Christmas), MC-36 (Hawaiian Christmas) and our new set CL-17 (Aloha) to make this card.  Below is a little tip for making your own Hawaiian print outfits.  Start by stamping 1 image of the shirt and 1 image of the dress (You can use scraps of paper since you just need the clothes).  Use the heart stamp that comes in CL-17 to stamp right over the two outfits...then cut each one out and glue onto each person.


Thanks for stopping by!!!

Friday, December 21, 2012

Gift Card Box

Back today with the same project as yesterday, but tweaked a little to fit a gift card.  Click here to get back to the original post. Follow the same steps,except start with a 9-1/16" x 9-1/16" card stock and score 3-1/2" from each side.  Other than that the instructions are the same...you can still use the same cover pattern too.  Here's what the box looks like:


I know my sidebar says that all designs on this blog are by Dandelion Designs...but I couldn't resist breaking that rule to share the following wonderful creations with you.   They were both made by the super talented Patti (Creations by Patti)...this link will take you to the instructions for the snowman box, but you gotta look around while you're there.  I admit I dumped out the goodies inside to figure how she made this...I still don't get it!!!


And I guess it's that time of year to get going on calendars...I've been having so much fun seeing what creative things people are coming up with!!  These are sure to inspire you:


Matchbook style calendar made by Lianne...so handy to keep in your purse!!!


Cuties by Edna from Oregon (Each girl has a different kimono pattern!!!):


Wow!!  Talk about mass production!!  These are by Karen (Have a Scrap Happy Day).  They're also magnets...what a cool idea!!


Thanks for taking a peek today!!!

Thursday, December 20, 2012

Last Minute Gifts

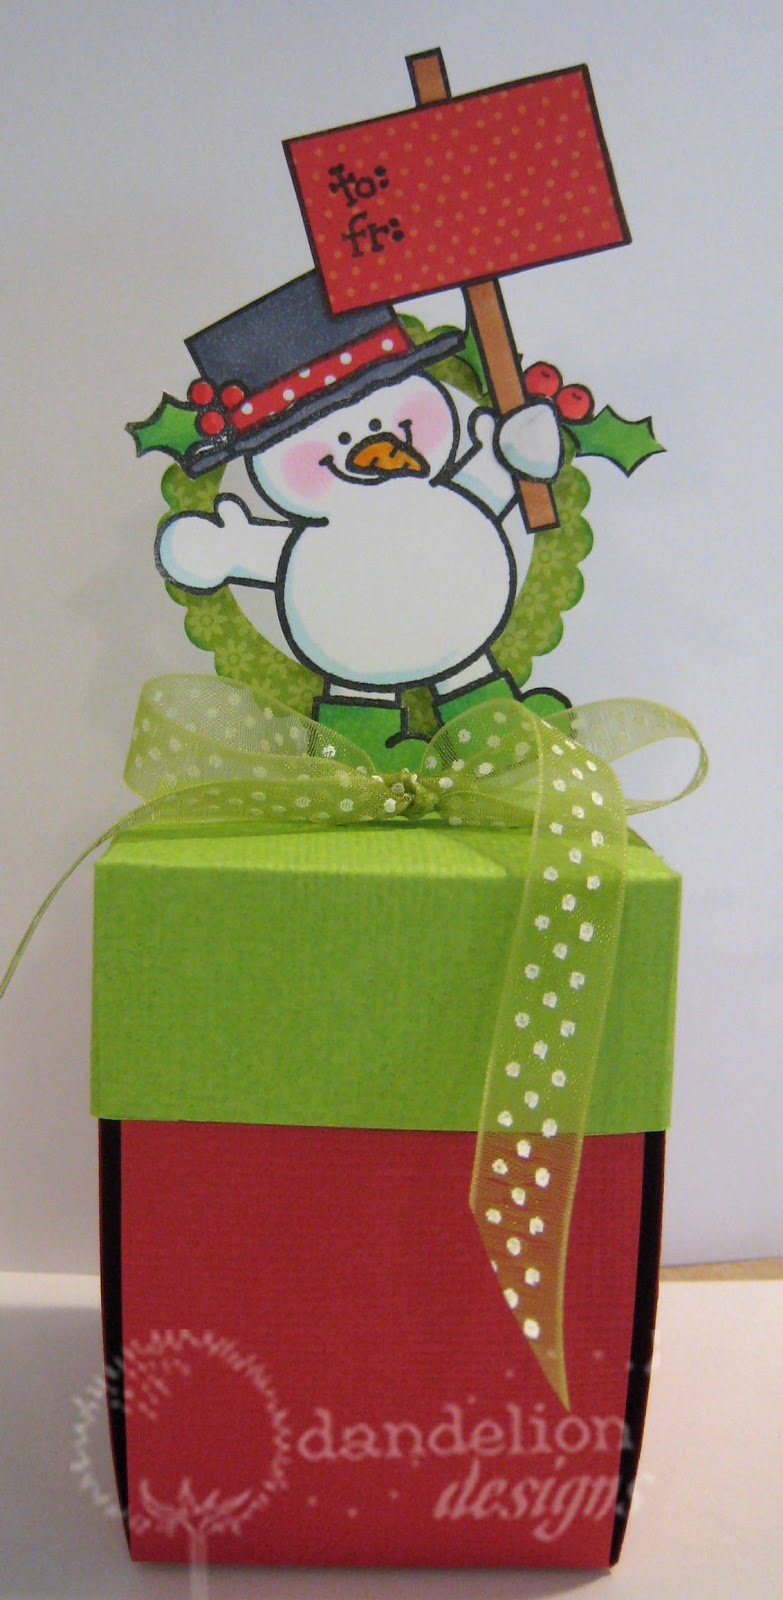
Hope you're all finding time to enjoy the holiday season!!  I've been doing some last minute crafting...I always end up with a few gifts of money and gift cards and I try to find some fun ways to "wrap" them.  This year I went with a project from a few years ago called an "Inside Out Box".  Click here for the original post with the how-to's.  Here's an example of the box done up for Christmas:


Remove the cover, and this is what's on the inside of the box:


Turn the box "inside out"...using the cover as the base for this stand-up greeting:


 I changed it up a bit to use as a money box.  I attached the snowman to the top of the cover:


And instead of attaching a character on the inside of the box, I wrapped some money around the stand in the center (you can tape the money to the "stand" if you want it to be more secure):


With a few tweaks you can use this same idea for gift cards...I'll show you a sample tomorrow!!