

Showing posts with label Mother's Day. Show all posts
Showing posts with label Mother's Day. Show all posts
Saturday, May 9, 2015
Saturday, February 16, 2013
More Chocolate Kokeshis
Hope you're all having a nice long weekend!! I was playing around with making more chocolate kokeshis (click here for original post)...and here they are:

Bride and Groom kokeshi...I used double stick tape to mount them on a 2-3/4" x 5" piece of card stock...then I stamped the words "Happily Ever After" and the rosebud (both stamps are from CL-14 (Roses) on a piece of vellum (the rose is stamped in black on front, and colored from behind)...then I just wrapped the vellum around the whole thing and taped it in the back. I was going to wrap it in a clear bag and throw some flowers and glitter in...but everything kept hiding behind the candy, so this is what I ended up doing:

It's hard to see with the glare...maybe this is a better angle:

I used a 5" x 6" bag with a seal. To start, I put the candies in the bag, on the left side (flap folds toward back to seal):

With the candy in this position, flip the bag over and upside down so the opening is now on the bottom. I used my Scor-Pal to make the cutting easier...just line the bag up in the upper right hand corner, then remove the candy:

I ran my scissors along the groove to keep my cutting straight. Make a cut along the 10" line...cutting through only one layer (the back side). Cut all the way to the fold, then cut 1" along the bottom edge (toward the corner of the Scor-Pal).

Lift the flap you've just created and run a piece of double stick tape at 1-1/4" from the right edge. Remove the backing from the tape and fold the flap back down to create the "pocket" for your glitter and flowers. Using regular scotch tape, tape over the cuts you made in the bag. Now slip you chocolates into the bag...and add flowers, glitter, ribbon on the other side and seal the top of the bag.

Here's an idea using a smaller sized chocolate for a baby. Follow the same directions from the original post except cut the card stock to1-1/2" x 3-3/4"...making your mark at 1/2" down from each side. The belt will be 1/2" x 3-1/4".

Click here to get a pattern for the little stand. Here's a view from the side:

Here's one for Girl's Day. The faces for these smaller chocolates are from CL-8 (Friends):

And one more:

ok...that's it!!!...hope you have some time to stamp this weekend!!!
Sunday, May 13, 2012

Sunday, May 6, 2012
Carried Away
I started off today intending to ink up one of our new mini girl stamps and use it to decorate a mini clothespin that I got from Ben Franklin. Well...one thing lead to another and I ended making clothespins out of all 7 new designs:

They're more decorative than functional. Each girl/guy is stamped and colored on white card stock with a layer of Glossy Accents over it. (Mini flower stamp is #5032). Then I thought it would make a really cute set and I should make some kind of box for them to go in:


Since Mother's Day is right around the corner, I thought I'd decorate it for that occasion. Then I thought I'd draw up a quick pattern to share in case you wanted to give it a try...click here. I also cut a piece of acetate to clip the pins to...3/4" x 6" (score at 3/8" from each side). Now that I have this set all ready to go, I thought it would make a nice "mini" giveaway...hop on over to our Facebook page to enter!!!

They're more decorative than functional. Each girl/guy is stamped and colored on white card stock with a layer of Glossy Accents over it. (Mini flower stamp is #5032). Then I thought it would make a really cute set and I should make some kind of box for them to go in:


Since Mother's Day is right around the corner, I thought I'd decorate it for that occasion. Then I thought I'd draw up a quick pattern to share in case you wanted to give it a try...click here. I also cut a piece of acetate to clip the pins to...3/4" x 6" (score at 3/8" from each side). Now that I have this set all ready to go, I thought it would make a nice "mini" giveaway...hop on over to our Facebook page to enter!!!
Saturday, April 21, 2012
Sakura Alphabet

I'll be working on some projects later...but here's a simple box topper for right now. Since Mother's Day is right around the corner, I labeled it for good ol' Mom:

Saturday, May 8, 2010

Thursday, May 6, 2010
Easy as 1,2,3
I was passing through a gift shop yesterday, and saw a packet of cleverly wrapped bath salts. I got home and adapted the idea for a favor...click here to get a pattern.

It's perfect for a "flat" favor (like the Ghirardelli chocolate I used below, or maybe some tea bags)...or a small gift. Cut out the pattern and fold along the dotted lines. Place your item into the cut-out piece, as shown below:

Then with just a few folds...One:

Two:

Three:

Flip over, fold and tuck flap into slot:

I cut out contrasting papers to fit the different flaps, and glued them on to decorate (I used a Martha Stewart border punch that I got from J's Knicknacks...it adds just the right touch!!):

Here's an idea for graduation:

Before I go, here's an adorable Mother's Day card I received from Diane:

It's a four panel, pocketed card with a different tag in each pocket!!! Those of you who make cards know how much work and care went into making this!!! Thanks, Diane!!!!
Hope you all have a great evening!!!

It's perfect for a "flat" favor (like the Ghirardelli chocolate I used below, or maybe some tea bags)...or a small gift. Cut out the pattern and fold along the dotted lines. Place your item into the cut-out piece, as shown below:

Then with just a few folds...One:

Two:

Three:

Flip over, fold and tuck flap into slot:

I cut out contrasting papers to fit the different flaps, and glued them on to decorate (I used a Martha Stewart border punch that I got from J's Knicknacks...it adds just the right touch!!):

Here's an idea for graduation:

Before I go, here's an adorable Mother's Day card I received from Diane:

It's a four panel, pocketed card with a different tag in each pocket!!! Those of you who make cards know how much work and care went into making this!!! Thanks, Diane!!!!
Hope you all have a great evening!!!
Wednesday, May 5, 2010
4 Days and Counting
You still have a few more days til Mother's Day...are you ready? If not...maybe this will help:

A cute way to wrap up a little gift for mom!! Here's the how to:

Start by cutting out your colored image and gluing it onto a punched shape. Use a 1/16" hole punch at each spot where you want to place a flower (punch 2 holes for flowers that will have more than 1 bead in the center). Thread a needle and tape the end of the thread to the back of the heart. Place the heart into the bag and insert needle through one of the punched holes...then through the bag, flower, bead...then back down again. For flowers with more than 1 bead...always come up through one punched hole and down through the other. See picture below:

When you're done...tape the end of the string to the back of the heart. Punch one more heart and glue it to the back of the first heart to cover all your strings and tape. The trickiest part of this project is trying to work in the limited space inside the bag!!! I was happy with the way it turned out, so I decided to make a matching card:


If you change the sentiment, you now have a baby card:

Stamps used: #A116 (Baby Girl), #A144 (Mother's Day) and #C140 (A Mother's Love).
Have a great day...and Happy Boy's Day to all the little guys out there!!!

A cute way to wrap up a little gift for mom!! Here's the how to:

Start by cutting out your colored image and gluing it onto a punched shape. Use a 1/16" hole punch at each spot where you want to place a flower (punch 2 holes for flowers that will have more than 1 bead in the center). Thread a needle and tape the end of the thread to the back of the heart. Place the heart into the bag and insert needle through one of the punched holes...then through the bag, flower, bead...then back down again. For flowers with more than 1 bead...always come up through one punched hole and down through the other. See picture below:

When you're done...tape the end of the string to the back of the heart. Punch one more heart and glue it to the back of the first heart to cover all your strings and tape. The trickiest part of this project is trying to work in the limited space inside the bag!!! I was happy with the way it turned out, so I decided to make a matching card:


If you change the sentiment, you now have a baby card:

Stamps used: #A116 (Baby Girl), #A144 (Mother's Day) and #C140 (A Mother's Love).
Have a great day...and Happy Boy's Day to all the little guys out there!!!
Tuesday, May 4, 2010
Clear Tote
Hi All!! Trying to get in a few more last minute ideas for Mother's Day...sometimes just a "little something" can add that special touch to your celebration!! Maybe this could be that "something":

I always have a really hard time capturing lavenders/purples in a photo...it always seems to come out a little too blue...anyway, click here to get a template for the base piece.

For the base, cut along the solid lines and fold along the dotted lines. Use double stick tape on the four tabs and fold into the base, as shown above (left). Once the base is completed...apply double stick tape to the inside edge of the 2 long sides of the base.
For the clear part of the tote, cut a 3" x 6-1/4" piece of acetate. Score at 1", 3", 4" and 6"...fold along these scored lines. Apply 1/4" double stick tape, as shown above...and adhere. Adhere the clear acetate into the base.

For the handles...I punched 2 holes with a 1/8" hole punch, then cut 2 pieces of 13" ribbon and threaded it ala Cinnamon Girl (a local dress shop). Thread the ribbon (as shown above) and tie a bow on the outside. Do the same thing for the other handle. Here's a shot of the totes empty:

To add the flowers...I used tacky glue on the stem and rolled the paw around it. The white, back side of the paper will now be showing...just color that part in to match the rest of the stamped image. Here's a close-up of the tag:

Stamps used: #1301 (Mom's Day), #B138 (Walking Ping), #C134 (Sitting Quincy) and #C135 (Sitting Pong).
Thanks for stopping by...hope your day is going well!!

I always have a really hard time capturing lavenders/purples in a photo...it always seems to come out a little too blue...anyway, click here to get a template for the base piece.

For the base, cut along the solid lines and fold along the dotted lines. Use double stick tape on the four tabs and fold into the base, as shown above (left). Once the base is completed...apply double stick tape to the inside edge of the 2 long sides of the base.
For the clear part of the tote, cut a 3" x 6-1/4" piece of acetate. Score at 1", 3", 4" and 6"...fold along these scored lines. Apply 1/4" double stick tape, as shown above...and adhere. Adhere the clear acetate into the base.

For the handles...I punched 2 holes with a 1/8" hole punch, then cut 2 pieces of 13" ribbon and threaded it ala Cinnamon Girl (a local dress shop). Thread the ribbon (as shown above) and tie a bow on the outside. Do the same thing for the other handle. Here's a shot of the totes empty:

To add the flowers...I used tacky glue on the stem and rolled the paw around it. The white, back side of the paper will now be showing...just color that part in to match the rest of the stamped image. Here's a close-up of the tag:

Stamps used: #1301 (Mom's Day), #B138 (Walking Ping), #C134 (Sitting Quincy) and #C135 (Sitting Pong).
Thanks for stopping by...hope your day is going well!!
Sunday, May 2, 2010
Video Cards
For today's project, there are no actual videos involved...it just looks like a VHS tape!! This idea came almost by accident...I was just trying to think of a way to present the gift/card inside (wouldn't it be cute to put a special message on the side of the "tape"?):

To get a pattern to make this VHS box, click here. **(Just a little extra note: This pattern came out very close to the edge of the paper...when you're printing this pattern out, make sure you select "No Scaling" or your printer may automatically shrink the pattern to fit the page.)** I also used a 1" hole punch to make that half circle in the box. For the card, I used a 6" x 7-3/4" piece of cardstock (scored at 3-1/2" and 4-1/4"). Decorate the outside of the card with your sentiment (this one is for Boy's Day):


For the inside, I used three 2" x 3" cellophane bags (I got mine at Ben Franklin)...and filled them with goodies. I attached each bag with a couple of glue dots on the back.

Here's one for Mother's Day:


Fill your bags up with whatever tiny treasures you want:

That's it for now...Have a great week everyone!!!

To get a pattern to make this VHS box, click here. **(Just a little extra note: This pattern came out very close to the edge of the paper...when you're printing this pattern out, make sure you select "No Scaling" or your printer may automatically shrink the pattern to fit the page.)** I also used a 1" hole punch to make that half circle in the box. For the card, I used a 6" x 7-3/4" piece of cardstock (scored at 3-1/2" and 4-1/4"). Decorate the outside of the card with your sentiment (this one is for Boy's Day):


For the inside, I used three 2" x 3" cellophane bags (I got mine at Ben Franklin)...and filled them with goodies. I attached each bag with a couple of glue dots on the back.

Here's one for Mother's Day:


Fill your bags up with whatever tiny treasures you want:

That's it for now...Have a great week everyone!!!
Tuesday, April 20, 2010
Candy Bar Card
Yesterday I promised I would turn my card idea into a favor...and with a few tweaks, this is what I came up with:

Pull the ribbons apart to reveal a candy bar and message:

Click here to get a simple template. You can start with your favorite Hershey-sized candy bar. I folded and taped the 2 end flaps of the candy bar upwards (to keep it out of the way of the sliding parts):

Below is a picture of the 3 pieces...the main piece and 2 sliding pieces. Cut along the solid lines and fold along the dotted lines. Apply double stick tape to the 2 ends of the main piece...and to one edge of each of the sliding pieces:

Insert your candy bar into the main piece and tape down one side as shown:

Tape down the 2 sliding pieces, as shown above.
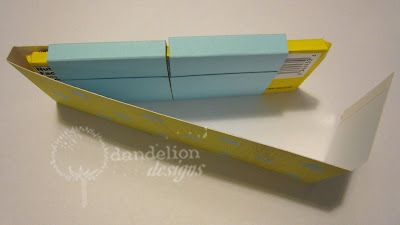
Slide the 2 blue pieces over the candy bar, and push all the way to the left.

Remove the double stick tape and adhere the right flap to the candy bar.

Move the 2 sliding pieces to the center of the bar and decorate. Pretty simple!! While I was at it, I made one for graduation:


It was so warm today, I had to keep sticking my chocolate back into the refrigerator because it kept melting...is summer already on its way?

Pull the ribbons apart to reveal a candy bar and message:

Click here to get a simple template. You can start with your favorite Hershey-sized candy bar. I folded and taped the 2 end flaps of the candy bar upwards (to keep it out of the way of the sliding parts):

Below is a picture of the 3 pieces...the main piece and 2 sliding pieces. Cut along the solid lines and fold along the dotted lines. Apply double stick tape to the 2 ends of the main piece...and to one edge of each of the sliding pieces:

Insert your candy bar into the main piece and tape down one side as shown:

Tape down the 2 sliding pieces, as shown above.

Slide the 2 blue pieces over the candy bar, and push all the way to the left.

Remove the double stick tape and adhere the right flap to the candy bar.

Move the 2 sliding pieces to the center of the bar and decorate. Pretty simple!! While I was at it, I made one for graduation:


It was so warm today, I had to keep sticking my chocolate back into the refrigerator because it kept melting...is summer already on its way?
Subscribe to:
Posts (Atom)


