Happy Saturday!! I wanted to share with you the project we did at Cute Stuff today. This morning started off very cloudy and rainy and dreary...so, I'd like to thank all of you who braved the weather to make it!! We made this little "mini cupcake" box:

You can download a pattern by clicking
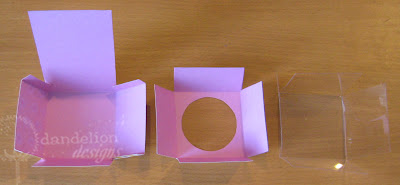
here. As usual, cut on the solid lines and fold on the dotted lines. There are 3 pattern pieces. They include (starting from left to right, below) a box piece, an insert piece and a cover:
It was a challenging to put the acetate cover on this morning...so, I changed things around a little. I hope this makes it easier!! We'll start by putting the cupcake into the insert piece. Put the acetate piece over the cupcake and scotch tape it down to the insert piece:

Next, apply double stick tape to the 4 tabs on the box. Remove the backing of 2 of the tabs (I did the 2 tabs on the left side), and adhere. Slip your cupcake into the box...then adhere the remaining 2 sides. Does that make sense? Here's a picture:

To finish it off, I punch 2 scalloped circles using my Marvy (pink) punch. I glued one circle to the top piece of the box (make sure you glue it high enough that your stamped image will clear the top of the acetate cover). Glue the second circle behind the first. Now, you can decorate it any way you want...for any ocassion you want!! Here are a few more ideas:

Stamps used: #C117 (Elliot), #1202 (Happy Easter Sign) and #5030 (Scattered Flowers). **Note: I stamped Elliot onto a printed paper and cut him out...that's how he got his "design")**

Stamps used: #B120 (Easter Rabbit), #A120 (Honey Bunny), #1212 (Easter Egg 1) and #1213 (Easter Egg 2).

Stamps used: #B102 (Max With Cupcake) and #5059 (You're Sweet).

Stamps used: #C104 (Maddy & Pip) and #4016 (Script Happy Birthday).

Stamps used: #B118 (Hoot & Annie) and #A117 (Always).
For those of you who are "culinarily-challenged" (like me!!)...I got these mini cupcakes in the Bakery section of Foodland (they call it muffins...but they're the same to me). I just added frosting and sprinkles. And here's one extra hint: buy more than you need...once you start making these, some of them will disappear!!! ;)


