Showing posts with label Money Card. Show all posts

Thursday, June 1, 2017

Folded Envelope

I made this folded envelope to hold a gift of money...just the right size to fit a folded bill.  Click here to get a pattern.


To see step-by-step how-to's...click here.  The pattern in the link is slightly smaller than the one shown in this picture...I enlarged the pattern to fit a folded bill.  Hmmm...maybe a gift for graduation?

Thursday, December 20, 2012

Last Minute Gifts

Hope you're all finding time to enjoy the holiday season!!  I've been doing some last minute crafting...I always end up with a few gifts of money and gift cards and I try to find some fun ways to "wrap" them.  This year I went with a project from a few years ago called an "Inside Out Box".  Click here for the original post with the how-to's.  Here's an example of the box done up for Christmas:


Remove the cover, and this is what's on the inside of the box:


Turn the box "inside out"...using the cover as the base for this stand-up greeting:


 I changed it up a bit to use as a money box.  I attached the snowman to the top of the cover:


And instead of attaching a character on the inside of the box, I wrapped some money around the stand in the center (you can tape the money to the "stand" if you want it to be more secure):


With a few tweaks you can use this same idea for gift cards...I'll show you a sample tomorrow!!

Friday, July 20, 2012

Musubi Graduation

Hey there!!  It's Friday...I'm sure you're all looking forward to a great weekend!!!  I know it's a little late for graduation cards...but this idea just popped into my mind, so I thought I'd share it before I forget it (you can always use this idea next year, right?)  It's a money card that can be used for guys...which I think is always a challenge when you're crafting!!


Click here for a really simple pattern.  Cut along the solid lines and fold along the dotted lines.  Apply double stick tape to 2 tabs. The image and saying are simply mounted on a belly band that goes around the card to keep it closed.  Since it takes about 15" to wrap around the card, you have to cut out 2 pieces of card stock to make the band.  Both are 2" wide...cut one at 7-3/4" and one at 7".  Take the longer strip and lay it across the front of the card (with approximately 3/8" on each side).  Wrap the ends around to the back of the card and apply double stick tape to each tab.  Attach the 7" piece of card stock to each tab.


Stamps Used:  Musubi and Musubi Saying - MC-21 (It Musubi Your Day)
Graduation cap and Graduation Saying - (MC-20 Graduation)

Thursday, April 12, 2012

Graduation - Hawaiian Style

Graduation in Hawaii ALWAYS involves giving and receiving leis...so many leis that the recipient has a hard time seeing over all of them!! That was the idea behind the stamps in MC-21 (Celebration). I made a really quick and simple money card using Ping (MC-1 Friend to Friend) along with stamps from MC-20 (Graduation) and MC-21 (Celebration):


I used the lei stamp 2 times to create a more layered look. Here's what the inside looks like:


I rounded my corners and then realized that a small piece of the money shows through at the bottom...oh well...I still like the look of the rounded corners!! :) Click here to get a simple pattern. Cut along solid lines and fold along dotted lines...apply double stick tape to 2 tabs. Also, cut 2 pieces of card stock ( 3-1/4" x 4" each)...one for the card front (left, below) and one for the card back (right, below):


Flip the pocket piece over and tape two 6" pieces of ribbon, as shown below:


Then simply glue the front and back pieces in place. Once you get going, you can whip out a whole batch of these in no time!!!

Wednesday, April 11, 2012

A Graduation Gift

There's still about 6-7 weeks before graduation season starts...but if this year is any indication, those weeks will fly by in no time!!! I guess the gift of money never goes out of style, so I decided to make a money box (pattern and instructions included in CL-9 Hello Cling Set) along with some of our new graduation stamps from MC-20 (Graduation):


Flip the cover down to reveal Henry, the graduate and your gift of money!!!


Friday, April 30, 2010

Flower Soft Leis

Happy Aloha Friday!!! I stopped by the Market City Ben Franklin the other day and Jenny introduced me to Flower Soft. I've seen it used before on other blogs, but this was the first time I came face to face with the product...and, what fun!!! There's a special glue (with a super fine tip to fit the smallest spaces)...all you have to do is squeeze the glue wherever you want to decorate, then sprinkle on the Flower Soft. Easy!!! They had some samples using the mixed colored Flower Soft for leis...perfect for graduation!!! I tried applying the glue to a piece of thread, to give it a more 3-D appearance:


Use stamps #1403 (Graduation Cap) and #1404 (Mini Graduation Cap) to turn any everyday stamp into a graduation stamp. Here's a close-up of #C117 (Elliot):


Oh yeah...this card is actually a money card...also very easy!! Start with a 3-1/2" x 7" piece of card stock for the base card...score at 3-1/2" and fold the card in half. Cut 2 pieces of 7" ribbon and tape to card as shown below:


Cut another coordinating piece of card stock to 3-1/4" x 7-1/2". Score at 3-3/4" to form centerfold...also score 1/4" away from the bottom and 2 sides. Fold along the scored lines and cut away the bottom corners, as shown below:


Apply double stick tape to the 3 tabs and attach to the card, as shown:


Here are a few more "graduates" (I'll use them in future projects):


I used a 1/16" hole punch at the places where I wanted the lei to "end". Thread the ends of the lei through these holes and tape down in the back. The Flower Soft actually covers up the punched holes.

Thanks for stopping by and have a great weekend!!!

Friday, December 19, 2008

This One's For You, Fran!

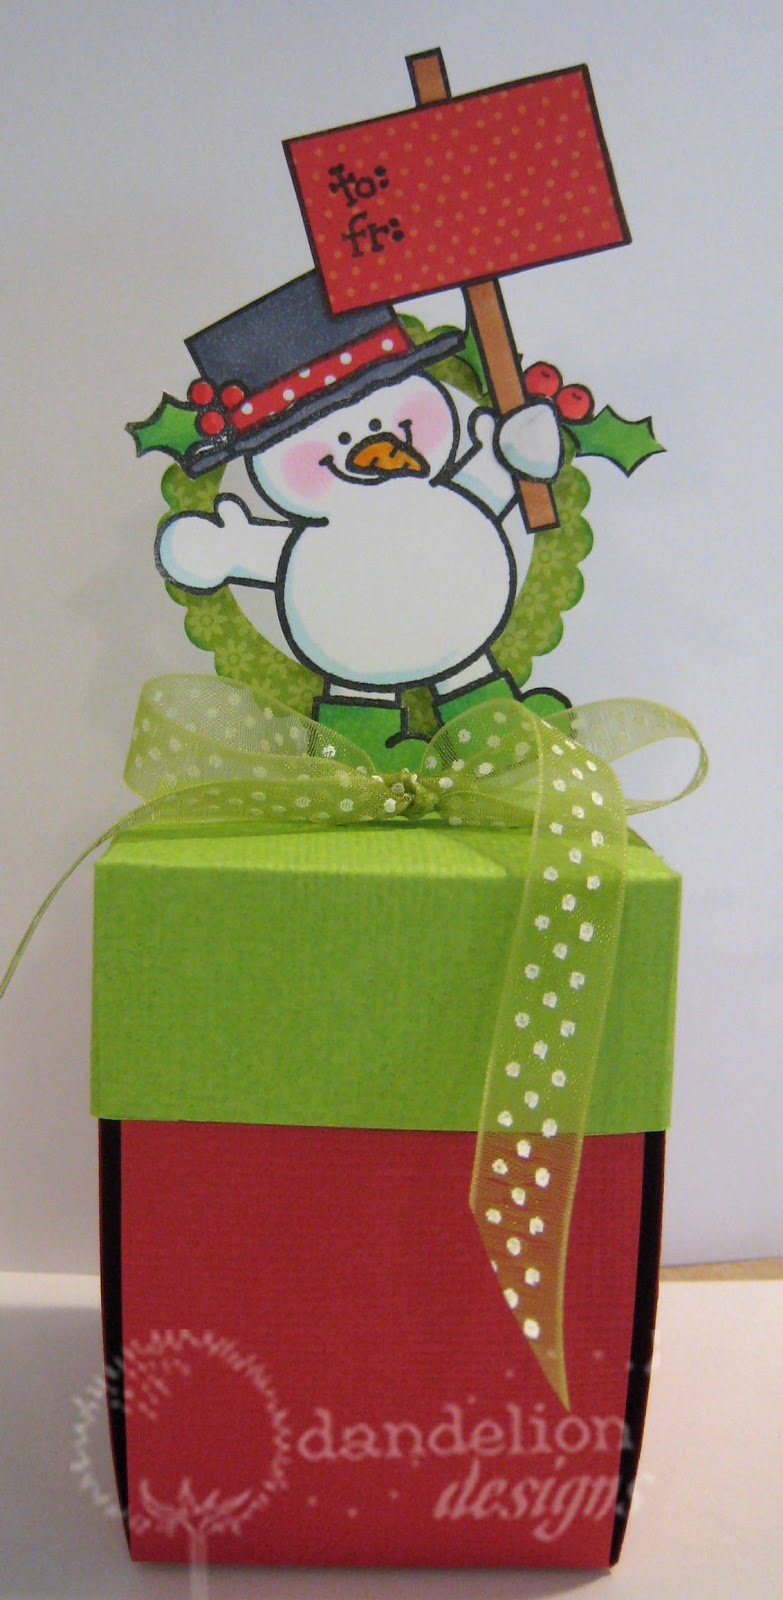
The other day my friend asked if I had an idea for a money gift card...I didn't really have a money card idea posted, so here's something I came up with. I don't know if anyone still has time to make things before Christmas...but, you can always use the pattern for birthdays or other occasions. It might be a little tricky to follow...it might help if you cut out the pattern and follow along...I'll try my best to explain. This is what the card looks like closed:


Then when you lift up the "cover", the money is revealed. I thought this might make a gift of money a little more fun to open.


You can download the pattern pieces by clicking here. There's one pattern for the box bottom and one pattern for the box top. We'll start with the box bottom. Cut along the solid lines and fold along the dotted lines as shown below:


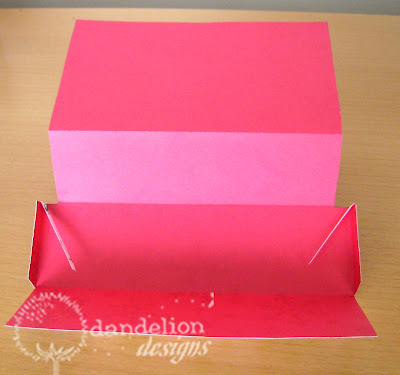
Apply double stick tape on the 2 thin strip tabs (on the printed side of the paper)...this is where it gets tricky...fold that tab down and the connecting tab over and press down to adhere. (It'll make more sense if you follow the fold lines).


Fold the two top sections down along fold lines:


For the box top, cut along the solid lines and fold along the dotted lines. Apply double stick tape to the 2 tabs as shown below:


Fold along the fold line and press down to adhere. You just formed a little pocket...you'll need to know this later.


For the next step...flip the box top piece over and fit onto the box bottom piece as shown below (this is the backview of the card):


Notice how the bottom piece slips into the "pocket" of the top piece...also, notice how the 2 green dotted tabs slip under the 2 white side tabs. Are you still following me? The next step is to put double stick tape on those 2 white tabs and fold the last bottom section up as shown below:


Now you can flip the card over to the front and decorate with a ribbon and a tag. Also, lift the cover and use double stick tape to hold the money in place.

Stamps used: #923 (Happy Holidays), #927 (Snowflake Scroll) and #930 (Elf With Bear). Please fell free to write to me if my directions don't make sense. Have a good night...good luck this weekend if you're still finishing up your shopping!!!

Wednesday, November 5, 2008

Miniature Clothespins


I decorated these miniature clothespins about a week ago by simply gluing on some stamped images to the clothespins. This first card uses stamp #928 (Bird With Holly...I love using rhinestones for the holly berries!!!!). But since then they've been hanging around waiting for me to do something with them..


Here I'm using the clothespin as part of a money card...click here to download a simple pattern. Just cut on the solid lines and fold on the dotted lines. Cut out a 2-1/2" x 3" piece of cardstock...fold your bill in thirds to fit the cardstock piece...punch out a scalloped circle with a Marvy (pink) punch and fold that piece in half. Fit the bill and cardstock piece between the folded circle and clip the whole thing with your clothespin. Now simply slide the money into the little holder.


This clothespin in simply clipped onto a Christmas tree branch to decorate it!! (stamp #919 - Angel Bear). Before I go...I've been getting a lot of questions about what I use to cut out my images (I know...I get carried away with cutting things out!!) Anyway...this is it:


It's a Fiskars mini detail scissors...and it's the only thing I use!!! It's really small, so it's easy to maneuver around the smallest detail. It's sharp down to the fine tip, so you can snip things perfectly. I've had this pair for probably 7-8 years and I've never had to sharpen them!!! (Boy!! Do I sound like a commercial?). Sorry, I'm not sure who carries it...but, that's what I use!! Hope that helps!!!

Tuesday, July 1, 2008

Maddy at the Mall

Happy Tuesday, everyone!!!! Hope you're enjoying our new designs!! Just wanted to let you know that we now have all the new designs up on our website...so, hop on over and take a look!!!

Our new design for today is Maddy at the mall. I have the pattern for this little purse that you can download here.


Just cut the main pattern piece along the solid lines and fold along the dotted ones. There's another rectangular pattern piece that is the part that holds the gift cards/money. For this piece, cut the slits in the cardstock before you fold along the dotted lines...make as many slits as you want...this is where you can slide the gift cards in. Use double stick tape along the sides and bottom of this piece and stick it on the center section of the main piece.


To attach the handle, I used a slot punch ON the fold line between the flap and center section of the purse (one punch on each side). Then I slipped one end of a 14" piece of ribbon through each slot and tied a knot to hold the handle in place. Use velcro to close the flap.

ok...now that the instructions are done, let's get to the fun part!! Leave a post by Wednesday, July 2 (Hawaii time) and I'll draw one winner at random to win one "Maddy at the Mall" stamp. Tell me the first place you would go if you had $1000 to spend. I'll announce the winner on Thursday morning July 3!!!! (Is it July already?!?!?!)