

Friday, December 19, 2008
This One's For You, Fran!
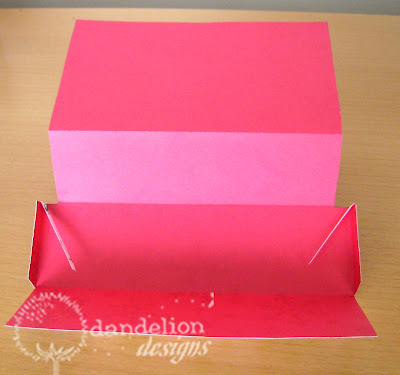
The other day my friend asked if I had an idea for a money gift card...I didn't really have a money card idea posted, so here's something I came up with. I don't know if anyone still has time to make things before Christmas...but, you can always use the pattern for birthdays or other occasions. It might be a little tricky to follow...it might help if you cut out the pattern and follow along...I'll try my best to explain. This is what the card looks like closed:

Then when you lift up the "cover", the money is revealed. I thought this might make a gift of money a little more fun to open.

You can download the pattern pieces by clicking here. There's one pattern for the box bottom and one pattern for the box top. We'll start with the box bottom. Cut along the solid lines and fold along the dotted lines as shown below:
Apply double stick tape on the 2 thin strip tabs (on the printed side of the paper)...this is where it gets tricky...fold that tab down and the connecting tab over and press down to adhere. (It'll make more sense if you follow the fold lines).

Fold the two top sections down along fold lines:

For the box top, cut along the solid lines and fold along the dotted lines. Apply double stick tape to the 2 tabs as shown below:

Fold along the fold line and press down to adhere. You just formed a little pocket...you'll need to know this later.

For the next step...flip the box top piece over and fit onto the box bottom piece as shown below (this is the backview of the card):

Notice how the bottom piece slips into the "pocket" of the top piece...also, notice how the 2 green dotted tabs slip under the 2 white side tabs. Are you still following me? The next step is to put double stick tape on those 2 white tabs and fold the last bottom section up as shown below:

Now you can flip the card over to the front and decorate with a ribbon and a tag. Also, lift the cover and use double stick tape to hold the money in place.
Stamps used: #923 (Happy Holidays), #927 (Snowflake Scroll) and #930 (Elf With Bear). Please fell free to write to me if my directions don't make sense. Have a good night...good luck this weekend if you're still finishing up your shopping!!!

Then when you lift up the "cover", the money is revealed. I thought this might make a gift of money a little more fun to open.

You can download the pattern pieces by clicking here. There's one pattern for the box bottom and one pattern for the box top. We'll start with the box bottom. Cut along the solid lines and fold along the dotted lines as shown below:

Apply double stick tape on the 2 thin strip tabs (on the printed side of the paper)...this is where it gets tricky...fold that tab down and the connecting tab over and press down to adhere. (It'll make more sense if you follow the fold lines).

Fold the two top sections down along fold lines:

For the box top, cut along the solid lines and fold along the dotted lines. Apply double stick tape to the 2 tabs as shown below:

Fold along the fold line and press down to adhere. You just formed a little pocket...you'll need to know this later.

For the next step...flip the box top piece over and fit onto the box bottom piece as shown below (this is the backview of the card):

Notice how the bottom piece slips into the "pocket" of the top piece...also, notice how the 2 green dotted tabs slip under the 2 white side tabs. Are you still following me? The next step is to put double stick tape on those 2 white tabs and fold the last bottom section up as shown below:

Now you can flip the card over to the front and decorate with a ribbon and a tag. Also, lift the cover and use double stick tape to hold the money in place.
Stamps used: #923 (Happy Holidays), #927 (Snowflake Scroll) and #930 (Elf With Bear). Please fell free to write to me if my directions don't make sense. Have a good night...good luck this weekend if you're still finishing up your shopping!!!
Tuesday, December 16, 2008
Christmas Tree Favor
Hi! Just a quick post today to share a simple pattern for a Christmas tree favor box...click here to download a pattern.

Just cut along the solid lines, and fold along the dotted lines. Put double stick tape on each of the 3 tabs. Fill the box with whatever you want, and tape a loop of cord to the inside top of the box. Adhere sides together and decorate as desired. This box uses stamp #A112 (Christmas Lights) and #922 (Merry Christmas). Here's a side view:

Sorry...gotta run!! Be back soon!
Monday, December 15, 2008
10 Days and Counting...
How's everyone doing? Hanging in there? Things sure do seem to get pretty hectic at this time of the year!! With that in mind...I'll try to come up with some quick and easy, last-minute projects. I know gift cards are always a popular gift...here's a fast and easy to wrap them up. I stamped #920 (Christmas Bee) and layered it on some punched shapes. I glued a strip of paper (approx. 5" long) to the back of the tag:

Wrap the paper strip around the gift card and secure with double stick tape (make sure you tape the paper strip directly onto the gift card so it can't slip out). Slip a bit of ribbon under the paper strip and hang up as an ornament:

Or, use it as a gift tag for a present (you can add a simple to, from label on the back).

It just takes a few minutes to complete. I also added the "O Christmas Bee"words (stamp #923), and tied it on with some silver cord. Have a great day
Tuesday, December 9, 2008
Post-it Note Holder

I ran across these pop-up post-it note holders and thought they would make some really nice gifts (without breaking your budget). Just do a little stamping to make them more special!! If you pop off the acrylic cover, you can remove the plastic piece (the part with the daisies printed on it) and use it as a template to make your own unique creation.

You could also include in your gift some different designs so the recipient can change the the look with the seasons:


Stamps used: #5040 (Butterfly With Rose), #5006 (Daisy), #5004 (Rosebud), #5058 (You Make Me Smile), #1104 (Dog With Heart), #1108 (Happy Valentine's Day), #B103 (Fancy Scroll), #701 (Pumpkin), #A108 (2 Pumpkins), #704 (Happy Halloween), #C109 (Sam & Max...I cut out just Max) and #923 (Happy Holidays).
Monday, December 8, 2008
Is It Just Me?
Or is December really flying by this year?? I haven't even started my Christmas shopping yet (please tell me I'm not the only one!!) Anyway, I'm trying to get back on the stamping track with a project using candy canes I had leftover from another project. I turned this one into a wall hanging to decorate your home or office:

I used ribbons, cord and jump rings to connect the different pieces...super simple! Stamps used: #B112 (Penguin Buddies) and #B114 (Merry Little Christmas).

I used ribbons, cord and jump rings to connect the different pieces...super simple! Stamps used: #B112 (Penguin Buddies) and #B114 (Merry Little Christmas).
Wednesday, December 3, 2008
Stocking Box

Here's a little box for tiny Christmas gifts...earrings, money...anything tiny. The actual box part measures approximately 1" x 2". Click here to download the pattern. As usual...cut along the solid lines and fold along the dotted lines...see the photo below:

For the stocking piece, attach two eyelets as shown above. For the box piece, follow fold lines and form a rectangular box. Apply double stick tape to the tabs on the bottom of the box.

Attach the box along the fold line of the stocking piece. I also inserted a 1" x 2" (approximate) piece of paper into the bottom of the box to hide the tabs. Slide a ribbon through the two eyelets to close the box. For the "patches" on the stocking I used a piece punched with a Marvy (yellow) scalloped oval punch. I cut the piece in half lengthwise, and used one half along the top edge of the stocking. I trimmed the other half to fit around the toe of the stocking. I also punched a 1/16" hole on the side of the stocking and threaded a gold cord in case you want to use the box as an ornament. Here's another sample:

Stamps used: #911 (Christmas Bear), #922 (Merry Christmas), #A111 (Snowflake Buddy) and #923 (Happy Holidays). Thanks for stopping by!!!
Monday, December 1, 2008
Mele Kalikimaka

Mele Kalikimaka and Hauoli Makahiki Hou!!! (That's how we say Merry Christmas and Happy New Year in Hawaii!!) While many places celebrate a cold and white Christmas...we here in Hawaii have a special way of celebrating. It may get a little cooler at this time of the year...but, not cold enough to keep us away from the beaches and outdoors. Here's a card to spread some of the warmth of the islands at Christmas time!!!

Stamps used: #C112 (Mele, Hauoli), #2001 (Aloha Flowers), B101 (Maddy at the Beach), #C101 (Sam at the Beach) and #905 (Christmas From Hawaii).
Saturday, November 29, 2008
It's Christmas Time!!!

A very belated Happy Thanksgiving to you all!!! I don't know how Thanksgiving came and went so quickly...but, I hope you all had an enjoyable time with family and friends!!!
This card started with the striped paper I found from American Crafts (Kissing Santa Claus). I punched out circles with my Marvy (green) circle punch...added Stickles glitter glue and wrapped them in pieces of cellophane to make them look like peppermint candies. I mounted them on pop dots and added stamps #911 (Christmas Bear), #912 (Christmas Monkey), #913 (Sweet Wishes) and #A113 (Snowflakes).
Sunday, November 23, 2008
Cute Stuff Make 'n Take
Note: The link to the pattern for this project has been fixed...thanks for catching that, Wanda!!
How's your Sunday going? I wanted to share the make 'n take project we did at Cute Stuff yesterday...thanks to Lianne and all the people who braved the yucky, rainy weather to come!!! (Special hi and thanks to Tina who is visiting from Washington and stopped by!!! At least the weather is a little better today, Tina!!)
Anyway...here's the project. My son's school used this idea as the cover to their yearbook a couple of years ago and I was finally able to make it into a card:

As you pull the insert up, the design changes from black & white to full-colored.


I'll try to explain it as best I can...please feel free to email me if anything doesn't make sense. I have 4 pattern pieces that you can download here. The pattern pieces are for 1 card piece, 1 insert piece, 1 acetate piece and 1 tab piece. (As usual, for all pieces, cut along the solid lines and fold along the dotted lines). We'll start with the card piece...

Fold the card piece as shown above. Once you have made all the folds, use a Marvy (pink) oval scallop punch approximately 1/2" below the notched portion of the card. (Make sure you push the paper into the punch as far as it will go).

Next, cut out the acetate piece and center it over the backside of the punched scallop oval (You can temporarily tape it into place so it doesn't move).

Open up the card and lay it flat. You're going to stamp your image in the center of the oval opening. Stamping on acetate can be a little tricky...keep a light, steady hand...you may want to practice on a scrap piece first). Use StazOn ink to stamp on the acetate. Remove the acetate piece.

Put a strip of 3/8" double stick tape to the top edge of your insert piece...attach the stamped acetate piece to the insert. Next, fold the tab piece in half along the dotted lines. Apply double stick tape to the 2 edges as shown above (you may want to click on the picture for a better look).

Fold the tab piece over the top of the insert piece. Punch a 1/8" hold in the center of the tab and tie a ribbon through it. Stamp and color the same image on a piece of white cardstock, and punch out with the same Marvy scalloped oval punch .

For the next step, you're going to take your colored image and apply glue to the back...slip it under the acetate sheet and make sure it matches up with the black & white image stamped on the acetate. Once the 2 images are aligned, press down and adhere the white cardstock to the (striped) insert piece.

Now you'll apply double stick tape to the two 1/4" tabs. Make a small cut into each tab as indicated on the pattern piece. Remove all the tape and fold closed along pre-folded lines.

If you now take a look into the card piece, you'll see a middle panel. (The front of the card will be the side with the window punched out). Take your insert piece and insert the cardstock behind the middle panel and the acetate piece in front of the middle panel...and slide it into the card. If your insert piece slides out of the card, you may want to put a tiny ( 1/4" piece) of double stick tape on the inside, upper right corner of the card (along the foldline)...and press together.

Add a little greeting to complete your card...also, to help your insert slide a little smoother...bend your card a little as shown below:

It's a fun card to do once you get the hang of it...hope you give it a try!!! Enjoy your Sunday!!!
Thursday, November 20, 2008
Playing Catch-Up
Happy Thursday!!! I've been meaning to post this project all week, but just never could find the time (Can anyone relate?) Anyway...I wanted to share the giveaway we did at J's Knicknacks this past Saturday. It's just a simple box with an acetate window holding 8 Dandelion Stamps. The lucky winner was Nicky!!!! A belated congratulations, Nicky!! Take a peek at her cute blog Ohh...Nicky!

I liked the way it turned out, so I tweaked the pattern a little bit to hold some candies. (I used Hershey's nuggets). Click here to download the pattern. Just cut along the solid lines and fold along the dotted lines. Glue a piece of acetate to the the backside of the window opening. Stamps used: Stamp Box - #B105 (Little Something) and #6003 (Flower Spray). Candy Box - #A106 (Chocolate Dipped), #922 (Merry Christmas) and #925 (Holly).

We'll be giving away another box of stamps this Saturday (11/22) at Cute Stuff!!! I'll be doing a make 'n take from 11:00 - 1:00. This will probably be my last make 'n take for the year...so, hope to see you there!!
Sunday, November 16, 2008
Candy Cane Stands

Wow!! Didn't this weekend just fly by? I wanted to share the make 'n take we did on Saturday at J's...thanks to everyone who stopped by...it's always nice to see old friends and make some new ones too!!! Click here to download the pattern we used for this project.

Cut on the solid lines and fold on the dotted ones (as shown above). The piece on the left is the base and the piece on the right is the part that holds the candy cane.

For the base...use double stick tape on the small tab to assemble. For the part that holds the candy cane...form the piece into a circle...overlap the ends slightly and use scotch tape to hold it together. Flatten this piece into an oval shape.

Now apply double stick tape to the oval piece as shown above (make sure you apply the tape to the very ends (this will ensure a more stable stand).

Now tape the oval piece onto the center of the base. (Please note that one side of the base is a little longer than the other two sides...make sure this longer side is opposite the oval piece).

For the candy canes...form two candy canes into the shape of a heart. Apply a small piece of double stick tape in the two places where the candy canes touch. Also, wrap a piece of double stick tape around the two tips of the candy canes This last piece of tape holds the 2 candy canes together and also holds the ribbon in place after you tie it. (I used neon pink paper to indicate the places where you apply the double stick tape). To decorate, simply tie a ribbon around the 2 candy canes, as well as on the base. Stamp and color an image and punch it out with the punch of your choice. Punch a 1/16" hole at the top and thread a silver cord through it and tie it onto the ribbon. Then, simply slip the candy canes into the base. (You may want to put a small piece of tape on the bottom of the stand to make it a little more stable!!) Here are a few examples of the project:


Stamps used: #C109 (Sam & Max), #C110 (Maddy & Snowman), #C111 (Snowman Hi), and #C113 (Max & Tweet). Sentiment: #913 (Sweet Wishes).
Subscribe to:
Posts (Atom)


