

Sunday, August 14, 2016

Monday, July 25, 2016
Keeping It Simple

Sakura branch stamp is from our cling set, "Happiness" (CL-21) and panda and wording stamp is from our cling set, "You Make Me Smile" (MC-58).

Sunday, July 17, 2016
Shave Ice Favors

Tiny favors...just for fun. Stamps are from cling set, "Sunshine and Shave Ice" (MC-43). Click here to get a pattern for the favor and the stand.


Wednesday, July 13, 2016
One More...
One more mini framed bulletin board...for tiny pictures or reminders. Stamps are from our cling set, "Never Forget" (MC-59).

Tuesday, July 12, 2016
Mini Bulletin Board
Here's a mini bulletin board made from a simple picture frame (I'm using a 5" x 7" frame) and a piece of cork board. I found my cork at Ben Franklin...they sell them in 12" x 12" sheets. Remove the glass from your picture frame and add a piece of cork measured to fit the frame. If you have trouble closing the back panel trim your cork back a little at the side that closes the frame.

I also decorated a couple of push pins by stamping our large sakura stamp (#6043) on shrink plastic and adhering them to some push pins (I used Glossy Accents to attach the sakura to the push pins).

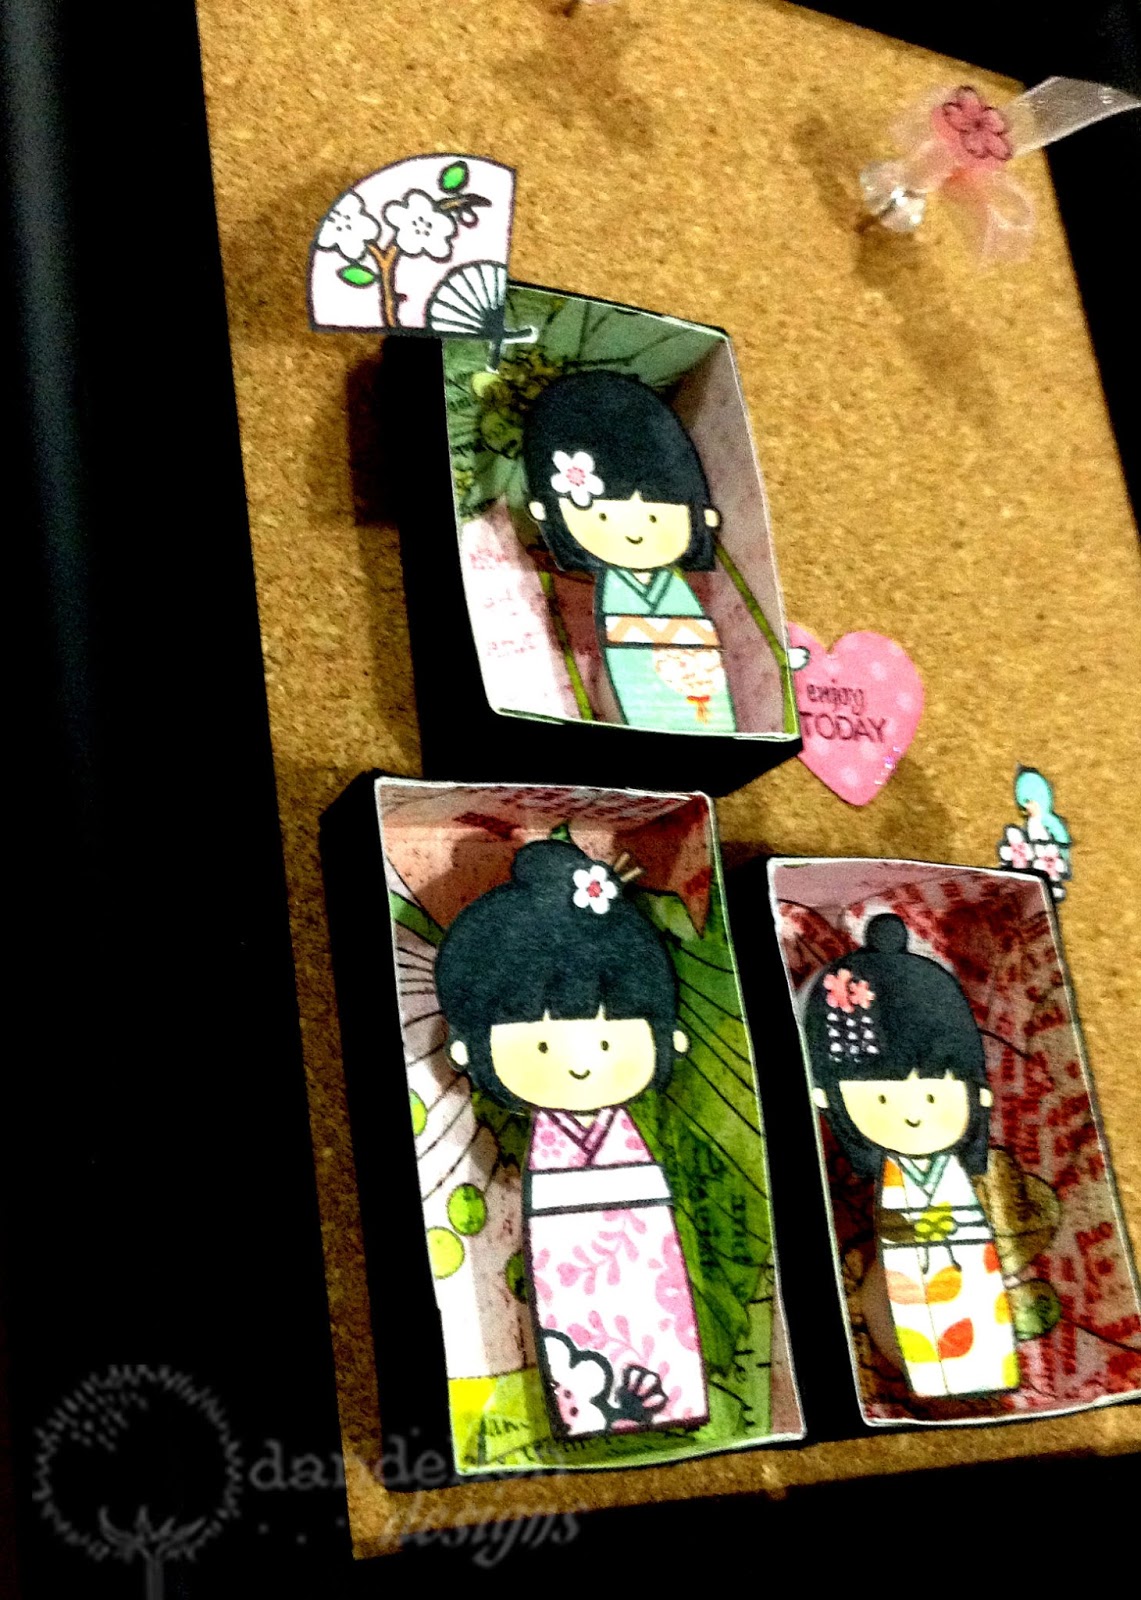
To make the boxes, click here for the patterns. The boxes come in three sizes (to fit each of the kokeshi girls from cling set, "Enjoy Today", MC-60)...an outer box (shown in black paper) and an inner box (shown in printed paper). Cut out each of the pattern pieces along the solid lines and fold along the dotted lines. Put double stick tape on each of the tabs (notice the tabs on the outer box face a different direction from the tabs on the inner box (this is to reduce the bulk when the two boxes are put together).

Put the boxes together. Adhere the tabs of the black box on the inside...and adhere the tabs of the printed box on the outside (as shown below). Fit the printed box into the black box (all tabs are now hidden). Before gluing the two boxes together, check to see if any of the top edges need to be trimmed (it's easier to do when the boxes are still separated).

Glue inner box to outer box:

Here's one more tip in adding a bird to one of the corners of the boxes (Bird stamp is from cling set, "Special Day", MC-61). Use the corner of a piece of card stock as your guide and mark off a 90 degree angle onto your bird design, as shown below. Make a clip right up to the corner of the right angle. Trim paper to form tabs (approx. 1/4" from drawn line). Fold tabs back along drawn lines and glue to the corner of a box.

Once you're done, you can either use the stand on your picture frame or mount it on the wall :)
Sunday, July 3, 2016
Labels...
When you have your stamps out, stamp a bunch of images on plain white office labels...then they're ready to peel and stick whenever you need them. (Stamp images are from, "Celebrations", MC-21 and "Never Forget", MC-59).

Saturday, July 2, 2016
Arigato Favor
A little thank you...kimono girl will "bow" with thanks...

All stamps are from our cling set, Arigato (CL-20). Start with a small box of candy. Cut 2 images each of girl and sakura (one b&w image and one colored image). Stamp and cut out one "arigato" sentiment. Cut out a contrasting strip of paper (Width is approx. 7/8"...for length, wrap paper around box and add 1/2". Score at 1/4" from each short edge). Also, cut a strip of acetate (1/8" x 1") and sandwich between b& w and colored images of girl (photo shows pieces already glued together). Attach bottom of the acetate piece to the b&w image of the sakura:

Wrap candy box with paper. Wrap contrasting strip of paper around box and add double stick tape above and below scored line at each edge (placement of double stick tape indicated by arrows). Center sentiment on contrasting strip of paper:

Remove backing from 4 strips of double stick tape, adhere so that contrasting strip is attached to box and forms a small tab at the top of the box:

Glue b&w sakura behind the tab:

Glue colored sakura in front of tab and onto b&w image of sakura, matching edges. Finish off with a gold bow. If you move the box gently, the girl will appear to be bowing :)

Monday, June 27, 2016
Desktop Sign
Fun desktop sign!! to make the base piece, cut a 2-1/2" x 5" piece of card stock. Score at 1/4", 1-3/4", 3" and 4-1/2". "Float" owl on a piece of acetate and adhere to tab before forming base piece. Fold base into triangular-shaped piece and adhere 2 tabs together. Owl is from cling set, "Whooo Loves You" (CL-19)...heart and sakura stamps are from cling set, "Special Day" (MC-61)...and sentiment is from cling set, "You Make Me smile" (MC-58).

Sunday, June 26, 2016
Little Gift Bag
I made these little gift/favor bags with stamps from our cling set, "Special Day" (MC-61). Place the main stamped image on the inside of a sheer bag, then hold it in place by stitching some flower/heart images (along with a tiny bead) to the outside of the bag. Add some candies for favors...or maybe jewelry for a special gift :)

Monday, June 13, 2016


Saturday, June 11, 2016
Pineapple Card
Happy Saturday! Found this cute pineapple paper at Ben Franklin (Imaginisce - Pineapple Days) and knew I had to make a pineapple card!! Click here to get a pattern.

Open the top of the pineapple to reveal a greeting of "Aloha!"

Cut out three pattern pieces along solid lines and fold along dotted lines. If using a paper with a one-way pattern, make sure you cut out the pattern so the design faces the right way (see below). Glue the hula girl on the thin strip, right under the fold line. Put some double stick tape on the tab at the top of the strip.

Adhere the strip with the hula girl onto the main card piece, as shown below. Put double stick tape along the edges of the pineapple (between the 2 dots on the pattern).

Lift up the strip with the hula girl and add one more piece of double stick tape, right at the fold. Remove backing tape from double stick tape and fold the strip back down.

Fold the bottom part of the card up and secure with the double stick tape:

Fold the top of the card down and add some double stick foam, as shown below. I also added a greeting to the top of the pineapple:

Mount the top of the pineapple onto the foam dots:

All stamps used in this project are from our cling set, "Aloha" (CL-17).
Friday, June 10, 2016

Sunday, June 5, 2016
Catching Up...Part 2
Posted a desk caddy project awhile ago...and I'm just now catching up with posting a pattern to make this project. Thanks for "bearing" with me ;)

To start, cut out main box piece (black) and 3 compartment pieces along the solid lines. Fold along the dotted lines. For main box piece...attach tabs (with double stick tape) to the INSIDE of the box. For compartment pieces...attach tabs (with double stick tape) to the OUTSIDE of the compartment piece. This way when everything is all put together, none of the tabs will be showing.

Here's a picture of all the pieces folded into boxes:
**Note that for all the compartment pieces...the printed design is on the inside of the box

Attach a header piece with double stick tape to the back side of the box (the back side that measures 3-1/4"). Header piece should be 3" wide x 4-1/2" tall. I used a heavy weight plastic, but cardstock works just as well:

Then just glue compartments into box (put glue on all sides and bottom of compartment pieces)...and decorate the header. Stamps for this project are from our cling set "You Make Me Smile" (MC-58)

Thanks for stopping by :)
Catching up...
Finally getting around to posting a pattern and instructions on how to make this little box:

Start by cutting 2 pattern pieces along the solid lines and fold along dotted lines. Apply double stick tape to top edge of cover (below, left)....and 4 tabs of box (below, right). Stamp image of girl (from cling set, Special Day MC-61) onto center section of box cover...and cut out "window". Next stamp, color and cut out image of girl, bird and banner (banner is from cling set, Enjoy Today MC-60). Also, cut a 2" x 2" piece of acetate and apply double stick tape to all 4 edges.

Form box by folding all four sides up and adhere to tab at each corner. Glue the colored images of the girl and bird onto the stamped image on the box cover. Add banner with some double stick foam dots.

Flip cover piece over and tape the piece of acetate behind the cut out window:

Wrap cover around the box and hold closed with the double stick tape:

Here's a slight variation...add a little "shoji" door to the top of the box (pattern for shoji door also included):

Cut out shoji door and glue a piece of vellum paper behind it. Mount shoji door on thin strips of double stick foam. Use double stick foam again to raise the image of the girl. Kimono girl and sakura flowers are from cling set, Arigato CL-20

Sunday, May 29, 2016

Subscribe to:
Posts (Atom)


