Pull the ribbons apart to reveal a candy bar and message:

Click here to get a simple template. You can start with your favorite Hershey-sized candy bar. I folded and taped the 2 end flaps of the candy bar upwards (to keep it out of the way of the sliding parts):

Below is a picture of the 3 pieces...the main piece and 2 sliding pieces. Cut along the solid lines and fold along the dotted lines. Apply double stick tape to the 2 ends of the main piece...and to one edge of each of the sliding pieces:

Insert your candy bar into the main piece and tape down one side as shown:

Tape down the 2 sliding pieces, as shown above.

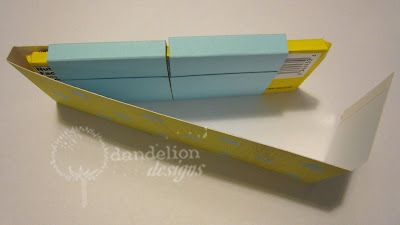
Slide the 2 blue pieces over the candy bar, and push all the way to the left.

Remove the double stick tape and adhere the right flap to the candy bar.

Move the 2 sliding pieces to the center of the bar and decorate. Pretty simple!! While I was at it, I made one for graduation:


It was so warm today, I had to keep sticking my chocolate back into the refrigerator because it kept melting...is summer already on its way?


11 comments:
ohmygoodness jean, you are just too creative! love your cute candy bar wrapper! thanks for sharing :)! have a wonderful nite! *hugs* and much aloha to you, steph :)
Ok, I love, love, love this.
So very cute.
HAve a question though.
Is the top side of the candy bar supposed to show, it has nothing covering it or should the entire candy bar be covered?
Also, when you said to remove the double sided tape...
Which part do you remove it from????
I love this though, just have to make one.
Blessings,
Maria
also, if you have time, could you post a picture of the back??
I'm a visual person.
So I absolutely love and thank you for the wonderful tutorial.
Blessings,
Maria
What a great idea. I'll have to give it a try. :)
What a cute idea, Jean! Luv that wrapper! You are so creative! Thank you for always sharing your creative ideas!
I absolutely must try & create my own!
Tammy
I can see how this can be adapted to so many items. Thank you for sharing. I love it!
OK,
I got one made last night and it turned out super cute.
I think I figured my questions out.
Thanks again for sharing this and the awesome tutorial.
Have lots of ideas in my head.
Blessings,
Maria
Hi Jean,
Welcome back. Hope you had a good rest. Thanks so much for sharing these cute ideas and the tutorial.
Naya
just adorable! thanks for sharing your template & tutorial! these will make such cute teacher gifts!
Jean,
You are so creative, this is such a neat, pretty & great idea. Thanks for sharing.
Hugs,
Denise
Hi Jean, happy to find your blog today when my sweet MIL shared a link to this post. Happy to be a new follower. Love, love, love this interactive card!!!
:O)
Jessica S
Post a Comment