Friday, April 30, 2010

Flower Soft Leis

Happy Aloha Friday!!! I stopped by the Market City Ben Franklin the other day and Jenny introduced me to Flower Soft. I've seen it used before on other blogs, but this was the first time I came face to face with the product...and, what fun!!! There's a special glue (with a super fine tip to fit the smallest spaces)...all you have to do is squeeze the glue wherever you want to decorate, then sprinkle on the Flower Soft. Easy!!! They had some samples using the mixed colored Flower Soft for leis...perfect for graduation!!! I tried applying the glue to a piece of thread, to give it a more 3-D appearance:


Use stamps #1403 (Graduation Cap) and #1404 (Mini Graduation Cap) to turn any everyday stamp into a graduation stamp. Here's a close-up of #C117 (Elliot):


Oh yeah...this card is actually a money card...also very easy!! Start with a 3-1/2" x 7" piece of card stock for the base card...score at 3-1/2" and fold the card in half. Cut 2 pieces of 7" ribbon and tape to card as shown below:


Cut another coordinating piece of card stock to 3-1/4" x 7-1/2". Score at 3-3/4" to form centerfold...also score 1/4" away from the bottom and 2 sides. Fold along the scored lines and cut away the bottom corners, as shown below:


Apply double stick tape to the 3 tabs and attach to the card, as shown:


Here are a few more "graduates" (I'll use them in future projects):


I used a 1/16" hole punch at the places where I wanted the lei to "end". Thread the ends of the lei through these holes and tape down in the back. The Flower Soft actually covers up the punched holes.

Thanks for stopping by and have a great weekend!!!

Tuesday, April 20, 2010

Candy Bar Card

Yesterday I promised I would turn my card idea into a favor...and with a few tweaks, this is what I came up with:


Pull the ribbons apart to reveal a candy bar and message:


Click here to get a simple template. You can start with your favorite Hershey-sized candy bar. I folded and taped the 2 end flaps of the candy bar upwards (to keep it out of the way of the sliding parts):


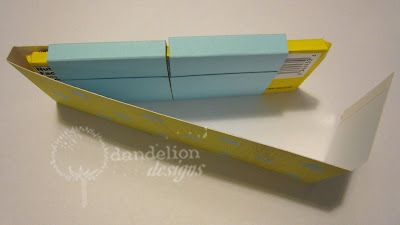
Below is a picture of the 3 pieces...the main piece and 2 sliding pieces. Cut along the solid lines and fold along the dotted lines. Apply double stick tape to the 2 ends of the main piece...and to one edge of each of the sliding pieces:


Insert your candy bar into the main piece and tape down one side as shown:


Tape down the 2 sliding pieces, as shown above.


Slide the 2 blue pieces over the candy bar, and push all the way to the left.


Remove the double stick tape and adhere the right flap to the candy bar.


Move the 2 sliding pieces to the center of the bar and decorate. Pretty simple!! While I was at it, I made one for graduation:


It was so warm today, I had to keep sticking my chocolate back into the refrigerator because it kept melting...is summer already on its way?

Monday, April 19, 2010

Hello....

Can't believe a month has flown by so quickly...I have a lot to catch up on, so let's get started!!! Here's my card for today:


Pull the ribbons apart to reveal a message:


I hope I can explain this all clearly...here goes:


The main card piece is shown at the top of the photo (above)...it measures 2-3/8" x 12"...score at 3" and 8-1/2". Apply double stick tape to the edge of the shorter (left) flap...and the bottom (pink side) of the longer (right) flap (don't tape together yet :).

The two sliding pieces are also shown in the photo above. Cut them both to 2" x 6"...score at 1-1/2" and 4". Fold along the scored lines and secure with double stick tape.


Flip the 2 sliding pieces over and staple a 4" piece of ribbon to each slider (as shown above).


You'll also need two heart shaped pieces...I used a Marvy scalloped heart (pink) punch. Stamp the sentiment in one. Cut the other heart in half and mount (with a pop dot) stamp #C134 (Sitting Quincy) and #C135 (Sitting Pong) to each half of the heart.


Using more pop dots, mount each half of the heart along the inner edge of the 2 slider pieces.


Slide the left half of the heart over the left flap of the card...and the right half of the heart over the right flap of the card. Slide each slider as far as it will go. Then remove the double stick tape on both flaps...lay the flaps, right over left, and secure the double stick tape:


Pull the two sliders apart and glue down your sentiment in the middle:


I finished off the card with some flowers to cover the staples...see the first photo. I have an idea to turn this card into a favor...check back tomorrow...we'll see if it works out!!!

I also wanted to share this cutie-pie card made by Cathy Y...ooohh, so sweet!!!


And I know this next one is super late...but, here's an Easter card from the talented Lianne (Cute Stuff). Oh well...maybe you can get a jump on ideas for next year!!! She cut apart stamp #B144 (Little Wagon) to make a cute little Easter "train"!!! So clever!!!


And check out these two sites with Dandelion Designs projects:

Pieces of Me (Jen)

Beth-a-Palooza (Beth)

Cute, cute, cute...thanks Jen and Beth for more fun ideas!!! So many project, so little time!!! Well...I guess that gets me caught up for now!!! Phew!! See ya!!!