Happy Monday morning!! Hope you all had a good weekend!! This past Saturday I did a make 'n take at the Pearl City Ben Franklin. There were games, prizes and a bunch of make 'n takes going on...lots of fun!!! Here's the project I did:
To make these simple favors, I started with a 3" x 3" piece of cardstock. Make a scored line at 3/4" on each side. Also, make a diagonal scored line in each corner square (as shown below):
Next, fold along scored lines (folding each corner outward). Using a 1/8" hole punch, punch a hole in each corner (close to the scored line). Thread a piece of ribbon through the holes in each corner and tie a double knot to form a box. Simple!!
To decorate, stamp your image on white and punch out with a Marvy (blue) oval punch. Punch 2 pieces of colored cardstock with a Marvy (pink) scalloped oval punch. Color in your image and glue to one of the scalloped ovals. Glue this piece to the inside of the box (as shown above).
Glue the remaining scalloped oval to the back of the box. Then just fill with your favorite treat!!!
Stamps used: #5052 (Koala), #4017 (Script Thank You), #5036 (Little Monkey), #6012 (just Because) and #C118 (Baxter).
Cheryl was at the paper party too and look at the goodies she brought to share with me:
Oooh...what fun!! More things to play with!!! Isn't the card she made using Catnip (stamp #B127) sooo cute? Hop on over to Cheryl's blog to see the cute make 'n take she did!!! Thanks, Cheryl!!
Thanks also to Cami, who stopped by to say hi and bring snacks too!!! So sweet!! Thank you, Cami!!!
One more thing to share. It's a long-distance RAK from Edna. Edna is originally from Hawaii, but now works at Pacific University in Oregon. Here is a thank you gift they made for their Hawaiian Club luau (using a lot of Dandelion stamps!!):
EVERY page was decorated...that's a LOT of stamping!! The effort was well worth it though, because it came out beautiful!!!
ok...that's it for today!! Thanks for stopping by...come back and visit soon!!
Monday, August 31, 2009
Wednesday, August 26, 2009
Good Luck in Vegas
Happy Wednesday!!! I was trying to use up a batch of glass marbles I got from Ben Franklin (I made a bunch of magnets earlier) and thought I'd make one into a good luck charm for someone going to Vegas. If you know anything about people from Hawaii, you know that they love to go to Vegas!! I thought this might make a cute little good luck charm for someone to carry around in their wallet or pocket:
Here's the story behind the frog (I don't know how accurate it is, but this is how it was explained to me long ago)...In Japanese, "kaeru" means both "frog" and "to return". By carrying a frog charm, your money is supposed to return to you. Anyway, that's my cultural lesson for today...please let me know if I got the story wrong!!
Click here for a simple die box pattern that you can wrap your charm in. Cut along solid lines and fold along dotted lines. Place double stick tape on the tabs shown below:
I'm going to be doing a make 'n take this Saturday, August 29 at the Pearl City Ben Franklin from 10:00 - 12:00...hope you get a chance to stop by!!!
Thursday, August 20, 2009
Cute Treat Box
I found these cute little plastic treat boxes at Stamps & Memories. They suggested filling it with candy and wrapping a belly band around it. So, I took their advice and this is what I came up with:
Since this little chick is holding a flower for an umbrella, I thought it would be really cute favors for a baby "shower"...whaddya think?
I also thought it would be a really good shortcut for making a shaker card:
I used a piece of 3-3/4" x 10-1/2" cardstock...scored at 3-1/2" and then again 7". I cut out a 1-3/4" x 2" hole in the center panel, then taped down the box to the side panel (as shown below):
Stamps used: #A119 (Rainy Days), #5035 (Monkey With Flowers) and #6012 (Just Because).
Wednesday, August 19, 2009
Playing Along
Thought it would be fun to play along with the color challenge going on at the Stamp 'N Scrap Hawaii blog. The deadline to play is 6:00 tonight...so, you still have a little time to enter!!! It was fun since these are not colors I usually think of using together!!
Thanks for stopping by today!!!
Friday, August 14, 2009
Stamp 'n Scrap Hawaii Challenge
Good Aloha Friday morning!! Just wanted to let you all know that there's a color combo challenge going on at the Stamp 'n Scrap Hawaii blog!!!! Here are the colors you need to use for the challenge:
You don't have to use Dandelion stamps for the challenge (but, if you've got 'em, why not use 'em!). Sounds like a lot of fun!!! Also, take a peek at what the super talented ladies on the Stamp 'n Scrap design team came up with. You have until 6:00 pm on Wednesday, August 19 (HST) to enter...the winner gets these Dandelion Designs stamps:
Looking forward to seeing what you all come up with!! Have fun!!!
Friday, August 7, 2009
It's a Boy! It's a Girl!
I made up some favors to announce a new baby's arrival!!! It might be a little too complicated if you're planning to make a ton of them...but, maybe you could make these for some of the really special people in baby's new life:
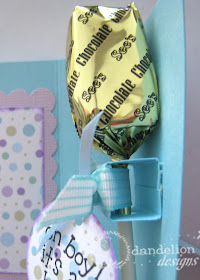
The piece on the left (in the photo below) is the part to hold a lollipop...it measures 1" x 2" (score at 1/4", 3/4", 1-1/4" and 1-3/4"). Then, using a 1/4" hole punch make 2 holes as shown below (you may want to click on the picture to get a closer look). The piece on the right is the card...it measures 4" x 5" (score at 2" and 3").
To make the lollipop holder...fold along scored lines to form a square. Overlap the two ends and secure with double stick tape. Insert the lollipop stick through the 2 holes you punched earlier and adhere it to the right inside flap of the card. I also used a ribbon to tie the lollipop on. Here's a side-view shot:
Here's a look at the finished card:
Here's the inside:
I added an area on the left inside flap where you can list baby's name, height, weight, etc. And for a baby girl:
Stamps used: #C115 (New Baby), #A115 (Oh Boy) and #A116 (Baby Girl). It's Friday!!! Have a great weekend!!!
Wednesday, August 5, 2009
An Idea Revisited
I don't know why I keep coming back to this idea, but every once in awhile a variation pops into my head. Just thought I'd share a couple of these with you:
This first card calls for 2 extra pieces...the blue piece measures 2" x 3" and the acetate piece measures 1-3/8" x 3":
Score a 1/4" tab along each lengthwise edge of the blue piece and apply double stick tape. Stamp #B128 (Dandelion Seed) with white Staz-On ink onto the acetate piece. Use a 1/8" hole punch to make one hole in the blue piece and one hole in the acetate piece...then thread a piece of white thread through the hole in the blue piece first, then through the hole in the acetate (as shown above).
Next, fit the acetate piece between the two scored lines of the blue piece. The paper I'm using is double-sided, so the flower print is the backside of the blue paper. The photo below shows the acetate fitted into the blue paper (from the backside). Tape the end of the thread coming out of the acetate piece to your card:
Remove the double stick tape from the blue piece and center it on your card...pull the thread taut, but make sure the acetate piece stays completely behind the blue piece. Now tape the front end of the thread to some kind of "pull tab". I punched out the sentiment "Make a Wish" (stamp #6011). Now when you pull the "Make a Wish" tab...a dandelion seed seems to blow away...
By the way...I got that cute dangling bead thingee from Cute Stuff.
This next card uses the same idea with a little twist. Here's what the card looks like at the start:
You can use any patterned paper with big flowers (approximately 2x larger than your character). Cut out 2 big flowers and 2 small flowers (to use as the pull tabs). Then stamp 2 characters at the top of a piece of white cardstock (I used #4025 Hooray Cat and #4026 Hooray Dog...along with stamp #5012 Happy B-Day). The cardstock should be about the same length as the big flower and about the same width as your stamped image. Cut out only the portion around your stamped image. Using a 1/8" hole punch, punch a hole in the center of each of the big flowers.
Now, cut out 2 pieces of cardstock...I'm using pink cardstock in this example. Make it 5/8" wider than your white cardstock piece and the same length as your flower. Make a 1/4" tab on each lengthwise side of your pink cardstock and apply double stick tape to the tabs...then glue that piece onto the back of each flower. Fit the white cardstock between the two scored lines of the pink cardstock. This card is a little trickier because you want the character to stop once it reaches the top of the flower. To do this, bring your stamped image to the top of the flower...hold it up to the light and mark the spot where you punched a hole through the center of the flower. Here's a view from the back to give you a better idea of what I'm talking about:
Because the flower has an uneven shape, you may have to trim the white cardstock piece to match the flower. First put your stamped image to the top of the flower and trim any white parts that show from the front. Then lower your stamped image so that it is hidden behind the flower and trim the bottom of the white cardstock in the same way. Now pass a piece of thread through the hole from the front of the flower, through the white cardstock piece with the stamped image and pull just enough thread through to tape to the card (behind where you intend to place your flower. Remove the double stick tape and attach your flower to the card. Push the stamped image all the way down behind the flower and tape a smaller flower to the end of the thread from the front side. Now repeat for the second flower. Phew!!! I really hope all of that made sense!!! Now, as you pull each pull tab...the following should pop up...first, this:
Then, this:
ok...I know this is a super long post, but I've fallen soooo way behind on things. I wanted to share a couple of cards I received. This first one is from Kris:
Hey...she's got the whole gang on one card!! And she added her own cute saying!!! Soooo cute!!!
And the next card is from Val:
You can't really see it from the picture, but she used a black glitter embossing powder. So, Max and the saying are so sparkly and pretty!!! Thanks to both of you for your kindness and creativity!!!
Thanks for stopping by...hope your week is going well!!!